Monday, May 31, 2010

Paraset ~ Dial = 0-100

The Paraset's dial used for "RECEIVER TUNE"  requires a friction or "Jackson" drive.  The originals look like they were from a company called Mirhead.  The are apparently painted white with black lettering. 


As usual the parts used in these reproductions, for the most part are "make due" or make better with modern parts.  Now I have turned a non- linear dial into a 0-100 dial scale using the water slider decals:


 and the disassembled dials I found earlier:


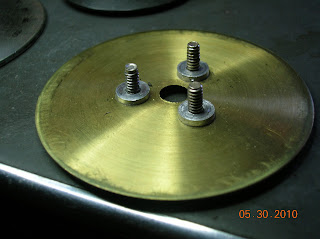
A friction plate is added. It was made from a single sheet of brass stock, cut roughly to size mounted on a ¼ " bolt, chucked again in my drill press, and filed and sanded to the final perfectly round shape needed.


The friction plate was mounted to the dial with some short standoffs and the whole assembly is held together by  three   6-32  slotted screws.  

The spacers were made - again-  on the drill press. I made these out of 1/16" aluminium washers.  The were placed on a scrap screw and filed down in the drill.    As you can see there is not much clearance from the mounting holes to the center shaft hole, so I needed to turn them down a bit to clear the shaft's hole.


Also I needed two additional holes in the plate spaced at 120° apart to match the holes on the knob.


The front side was polished by spinning the plate and using some #00 steel wool to clean it up.  I had to be careful as this disk is actually made out of plated brass, just like the threaded standoffs I  used for the shaft. 

The large decal presented a few problems with stretching the  decal material and took a bit of coaxing to get it to properly lay on the plate:


The back side was almost this dull:


Awaiting final assembly:


The resulting tuning assembly consisted of the pinch wheel, made out of two thin plates of brash captured on a #4 x
¼" dia (0.25 Ø)  M-F round spacer.  The two spacers screw into each other and the second male thread part was cut off and later used as the pointer! 


~ ~ ~

PINCH WHEEL ASSY:
The brass pinch wheels were actually stacked  together but the material was flexible enough to bend around this disk.  I tried some washers, even pounded and sanded down and nothing was as smooth as just the two disks sandwiched together! 


[ I need some photos of this assembly!]

The bushing was a ¼" shaft bushing from an old potentiometer.   The pinch drive was assembled mostly in place and fine adjustment was from the elongated hole in the chassis. 

[picture of adjustment hole]


This hole probably was unneeded as the shaft was essentialy at the location of the original hole before I elongated it.

The assembly went as follows: 

1) First put the bushing in the chassis, followed by the first M-F spacer  (Male end up);  

2) then I slip the first pinch disk on the threads, below the friction plate, followed by the second which sits on top;

 3) Then I added a #4 split ring lock washer to help hold the assy together. 

3a) Followed by the top part of the shaft screwed down on the first threads. 

4) I locked the whole assembly in place by putting a screws in the threads under the chassis, and mounting the knob. I tuned both the knob and screw in opposite directions and this locks the whole thing in tight enough to not come unscrewed during its operation.  No locktite was needed.

[need another picture of assembly]

..  This along with some petroleum jelly in the bushing produces a "smooth as butter" tuning knob with about a 4:1 ratio; very nice!


~ ~ ~


Sunday, May 30, 2010

Paraset ~ Tube Sockets

The tube sockets are now riveted with the eyelets described a few posts ago.  Everything went as planned and the eyelets rolled just fine using the two tool method. 

While the sockets are not made of the same materials as the originals:


Socket on SER No 2357 Photo: SM7UCZ


It has the same style as the originals:


I think my version has a certain US Navy look and feel,  not surprising,  since I spent 20+ years designing and making similar devices for the Navy! 


It is starting to look like a Paraset radio now...The project has come a long way from that rusting scrap metal plate!

Friday, May 28, 2010

Paraset: Lettering with Decals ~ Pt. 2

Here are the results using the water-slide method:


As you can see the masking tape is still in place and the holes still need to be cleared.  The SERIAL NUMBER tag is also a slide decal on a scrap of metal and is only temporarily in place with some un-set eyelets.


On an angle you still may see some of the plastic carrier materials.  Placement is a little tricky as there can be no pencil guidelines or any marks, and the material is extremely prone to stick to itself as well.   Glad I made plenty of duplicate labels!


Continuing clear coats and sanding downs, with extreme care not to sand off the decals. 

The method is:
1) to only cut as much carrier as needed, (see my last post) the irregular shapes and ones cut as close as possible to the letters seem to be the best.  

2) For sanding; the trick is, use ultra fine sand paper on a block, and rub just enough to just knock off some of the clear coat on top of the decals. You want to only see the carriers as dull white and not areas surrounding to start and eventually the whole surface is matching as the clear coat builds up in between the decals.

3) Multiple light coats between sanding.  The idea is to build up the clear material surrounding the labels until they are at the same level

4) **Keep the area clean as possible! Dust and dirt will collect and stick on the coat. Try not to touch the surface to see if it is dry, just give it time.  (**Yes, this means all cats were banned from the workroom!)

Just keep building up the low areas and the decals carriers will disappear!  (no magic, just a light touch and plenty of coats ~ I lost count but at least 4 t0 6 )


Tools:
I used a fine Iris scissors, tweezers, a small bowl of lukewarm distilled water (Hot water does not work! ~ the decals will shrivel up, tap water may leave a mineral film) and a dabbing tool ( Looks like a paint brush with a little sponge attached.) and Krylon Clear Gloss ( No. 7110) and 3M 9084 Ultra Fine Sandpaper  on a sanding block.

~ ~ ~

Again, as with the painting, it seems like a lot of work. But you can do a coat and sand cycle over a couple of hours in between other things ~ makes it a little less tedious.

Note: The decals came with a clear coat as well that was sponged on. I only used this on the sheet as directed. I suppose the enamel on the sheet would be just fine.

Saturday, May 22, 2010

Paraset~ Panel Finish - With Paint!

Instead of the nickel plate;  I elected to use simple enamel spray paint.

I am no painter, but I have painted on metals before, surface preparation is the key to a good outcome. The one thing I have learned is painting steel is by far easier than aluminum, which is like, in fact, painting on glass.  It will peel off and look terrible in no time if it is not prepared properly.  The chemicals you need to prep the surface are pretty nasty and toxic as you actually need to etch and de-glaze the surface.

Prep:

Steel on the other hand is far simpler, since most auto body repairs are steel, lots of material is readily available.   I start preparing the surface by a fine sanding, followed by de-greasing the surfaces.  I use carburetor cleaner, which is really just strong solvents in a spray can,  to remove any oil:

Item #08796 3M™ Carburetor Cleaner

Make sure to handle the panels very carefully only with gloves after cleaning, not to get any oil, even by simply by touching the surfaces.

I put then carefully put some blue masking tape discs on bottom around screws and connections with tweezers.  I wanted these holes to be electrically grounded.   I suppose I could have skipped this and simply removed the paint later with a small rotary brush.  


Next, two coats of:  Item #249415, Rust-Oleum® Sandable Primer  - Gray 
Sanded between coats, with fine sandpaper on a sanding block, not just with sandpaper.  The idea is to make a smooth surface to fill in the scratches, low spots, and tool marks. 

I then let it bake in sun for an hour or so.  This helps let the VOC solvents in the paint evaporate. The bottom side had only one coat, no sanding just to stop any rust since it had been sanded and de-greased

With primer the idea is to make a smooth surface for the color coats:


Second PRIMER:  


I only sprayed one coat of primer with no sanding  which is why it is dull compared to the front surface:


 Note:  Masking tape on back side is covering some holes.

Followed by Three light coats of Industrial Spray enamel:
Item # 37487, Krylon® Industrial Grey Tough Coat® Acrylic Enamel Paint

Let dry for an hour or so in the sun, with a ery light sanding between the coats.   

Then baked it on -  after the final coat in a small toaster oven at its lowest setting for about 30 - 45 mins.  I read the max surface temp was about 145°F  with an IR thermometer.


Coat #2:

Final coat!   I know, it sounds like a lot of work, but really not too bad, I did it in only one day.


Next, I will  apply decals and use a clear coat to protect the decals, and then finally remove the paint on the counter sink holes with the same bit used for making them for even more electrical contact area.

Note: The hole for the crystal holder is back?  Yes, as suspected, drilling through two hardness's of materials was an interesting challenge, which is why the hole is not countersunk.  I ended up using some epoxy putty to fix it. I had to grind the hole out and enlarge it bit to effect the repair.   

 Also there are four more "hidden" holes!  Yes, I pre-drilled the 4-way mounting holes for the choke transformer and filled in for future used if needed, since I had the locations marked.


Sunday, May 9, 2010

Paraset~ Lettering with Decals

The problem with lettering the paraset panel ~ Solved?  Well, I think so.  I now intend to use a method called water slide decal. 

Decal Paper.COM

I chose the ink jet version, so I could use color for other projects.  The process is simple you make a decal pattern, print it off on this special paper, cut out the decal, soak in warm water, apply to the panel and blot.  The next phase involves using a clear enamel to protect the carrier which is a real thin plastic material. 

Decal Patterns:


Power supply Patterns:

Dial Close up:
Note the dial pointer.  I made this from one of the #4 M-F  0.25 round stand off I used in making the friction dial parts.  I found these are really plated brass and chucked up in the drill press touched up the cut side with some sand paper.  I intend to cut a thin line with a razor saw and fill with some black enamel.  I think it looks more finished than just a screw head.